Wordpress How to Change Max Upload Size
wordpress
Easy Means to Modify the WordPress Upload Limit
In this postal service, nosotros hash out the main methods to increase the WordPress upload limit - a problem that many users face when trying to add files to their websites.

While creating a website, yous can face the trouble of the limited file size uploads in WordPress. We know how frustrating this can be when you wish to add a specific file without sacrificing quality.
This post focuses on various ways to change the maximum upload size in WordPress. No matter whether yous are in favor of coding or need a coding-free method, we have a suitable solution. Read the commodity and change your WordPress upload limit easily.
What Is the Maximum Upload Size in WordPress?
The maximum upload size differs for WordPress users. It may depend not only on WordPress itself but too on your server. Unremarkably, hosting providers set a limit to forestall users from uploading big files.
Normally, the WordPress upload limit is from 4MB to 128MB.
Why Increase the Maximum Upload File Size in WordPress?
You lot may need to increase the maximum upload file size for various reasons. Let's wait at the almost mutual ones.

Keeping Your Website Upwardly-to-date
Regular updates are the cardinal to success for many websites, particularly, blogs. Adding media is an essential office of such updates. Thus, file limits, especially very low ones, can frustrate you when you can't include a desired video or paradigm of good quality.
Installing New Themes or Plugins
Sometimes, if you want to change your WordPress theme or install a new plugin via the WordPress admin dashboard, these elements tin exceed the maximum upload file size. So, to get the desired wait or functionality, yous should change the limit.
Creating a Digital eCommerce Store
If you wish to create a website selling digital files of various kinds (east.g., videos, books, pictures, etc.), you lot'll definitely need to increase the limit of file uploads. Digital goods can be hundreds of megabytes and even more.
Publishing an Online Portfolio
Similar to online stores, portfolios usually feature the best works of a person, and these files tin can also exceed the set limit. If you don't want to choose what to present in your portfolio just by file size, you lot'll need to increment the upload file size.
Adding Media as Website's Background
Information technology's possible to set a video or a high-resolution image as a site's background. Such files tin be pretty large, so you have to make sure that you increment the limits to be able to add quality media to your site.
Whatever the case is, if you demand to upload a large file and get an alert informing you that information technology's impossible, you need to increase the maximum upload file size.
How to Check Your Maximum File Upload Size Limit in WordPress?
Y'all can bank check your current maximum file upload size in several ways.
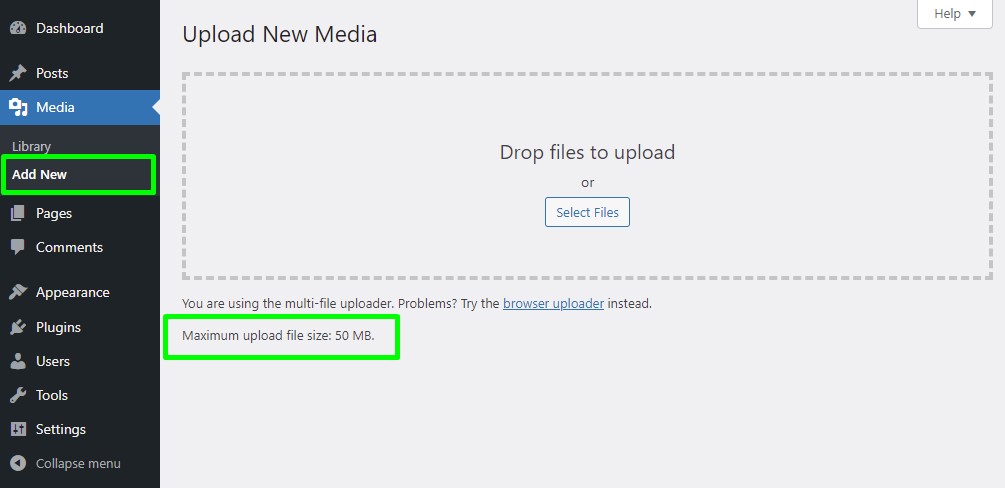
i. In the Media Library
The easiest and fastest way to bank check file sizes is to try to upload a large file to your WordPress Media Library. To do this, you should
- find 'Media' on your dashboard and cull this carte du jour item
- click the 'Add New' push (or try dragging and dropping files to the specialized area)
- check the message beneath the file upload field.
If your file exceeds the limit, the upload will fail, and y'all'll see the "Maximum upload file size" in the message.
In the screenshot below you can see that the maximum upload file size is currently 50MB.
ii. In the Site Health Info
Starting with WordPress five.2, you can encounter detailed information about your WordPress website configuration on the site wellness info screen. Information technology is here that y'all'll find technical information near your permissions, including file sizes.
To open Site Health info, information technology is necessary to press on 'Tools' on your dashboard, select 'Site Health', and go to the 'Info' tab.

Afterwards, you can whorl to the Media Handling dropdown and check the maximum size of an uploaded file.

Additionally, yous tin check the data in the Server dropdown. If your server settings limit your maximum upload file size, y'all'll run across it.
How to Change Maximum Upload Size in WordPress
Now, let's speak virtually various ways of increasing the maximum upload file size.
1. Modify Theme Functions File
WordPress themes include a template called functions.php or the theme functions file. When you lot install a theme, information technology gets activated automatically. You tin edit this file by modifying its PHP code to change the default features on your website.

To increase the upload size, you lot tin can add the post-obit lawmaking to your functions.php file:
@ini_set( 'upload_max_size' , '128M' ); @ini_set( 'post_max_size', '128M'); @ini_set( 'max_execution_time', '300' );
2. Create or Edit an Existing PHP.INI File
If yous have admission to your WordPress root folder, you lot can try this method. With the help of the FTP or File Manager app in your cPanel dashboard, you can change or create the php.ini file. This file includes your default PHP settings. So, open your WordPress root directory and await for the php.ini file. If at that place is one, open information technology. If your binder doesn't comprise this file, yous can easily create it.
Then, with the aid of any text or code editor, add the following code to the php.inin file:
upload_max_filesize = 64M post_max_size = 64M memory_limit = 128M
Retrieve to save the changes in the file. Sometimes this method will not work if your hosting provider doesn't let you alter PHP settings.
iii. Modify the .htaccess File
Another way to increase the WordPress upload limit is the .htaccess method. It is suitable for those whose servers run on Apache. To change the upload file size, you lot take to update the .htaccess file located in the WordPress website's root folder.
Open the file manager of your cPanel and discover the .htaccess file. Later, right-click on the file, choose 'View/Edit and add the lawmaking below to the file:
php_value upload_max_filesize 128M php_value post_max_size 128M php_value memory_limit 256M php_value max_execution_time 300 php_value max_input_time 300
Relieve the changes in the file and make sure you upload it back to the server.
If your server is running PHP in CGI manner, y'all won't exist able to add the directives to the .htaccess file. In this case, you'll get a 500 Internal Server Mistake, and you should endeavor another method.
4. Contact Your Hosting Provider for Help
Most hosting providers offer technical support, and helping yous to increase your upload file size is an easy undertaking for them. Hence, reaching out to your hosting company is one of the easiest ways to modify file upload limits.
You tin commonly get support via emails, chat, or phone. Contact the visitor, explain what you demand, and ask them to alter the necessary settings for you (if this is possible in your hosting plan).
5. Increase the Max Upload File Size in WordPress Multisite
In example you accept several websites running every bit a network in WordPress Multisite, you can modify the upload file size for all sites in the network simultaneously. To do this, open the Network Admin dashboard and cull Network Settings in the Settings section. The latter contains the 'Max upload file size' field. Merely increase the value (which is in Kilobytes) and save the changes.
Note that editing settings via this method will not override the server's limits. In other words, if the server upload file size is smaller than the one you set in the WordPress Multisite, the server will not follow the WordPress settings.
half-dozen. Create or Modify the '.user.ini' File
If you can't change your php.ini files considering your hosting provider doesn't allow you to alter the global PHP settings, you tin can attempt configuring the .user.ini file.
Like to php.ini and .htaccess files, the .user.ini file is located in the website's root folder. If it is not there, you can create it yourself. Then, add together the lawmaking below to the .user.ini file:
upload_max_filesize = 64M post_max_size = 64M memory_limit = 128M
Equally you can see, this method is the same as changing the php.ini file, and you just accept a unlike file proper noun.
7. Alter PHP Options via cPanel
Another WordPress increase upload size method is to apply your server's cPanel dashboard. If yous can configure your server in this way, you'll be able to adjust upload limits.
When you log in and open the cPanel dashboard, choose 'Software' and 'Select PHP Version' in it. Then, you'll see a folio with the PHP extensions where yous should switch to the PHP options. Yous should find the upload_max_filesize choice and cull the desired file size in the dropdown carte du jour. Remember to check post_max_size and memory_limit, too.
In the newest cPanel versions, there's no demand to click the 'Save' button, as all the changes are saved automatically. Notwithstanding, if you take an older version and do run into such a button, remember to save the settings.
8. Increase the Max Upload File Size in Nginx
For WordPress websites running on Nginx servers, you have to edit both the php.ini and nginx.conf files to change WordPress max file upload size. Follow the steps below to adapt the settings.
1) Modify the php.ini file. It is unremarkably located in the /etc/php/vii.4/fpm/ binder. Open the php.ini and add this code:
upload_max_filesize = 64M post_max_size = 128M
Remember to save the changes in the php.ini file.
2) Enable the applied configuration by restarting PHP-FPM. To do this, run the following lawmaking in your final:
sudo service php7.four-fpm restart
iii) Add the directive which sets the upload size limin to the nginx.conf file. Use this address to find the file: /etc/nginx/nginx.conf. Afterward opening the nginx.conf file, add the directive below:
client_max_body_size 128M
It's possible to declare the directive in various blocks:
- the http {…} cake
- the server {…} block
- the location {…} block.
You lot should note that if you lot add the directive to the http block, you'll modify the settings for all the sites/apps hosted on your server. If you only want to change a detail site/block hosted past the server, y'all should define the directive in the server block. Additionally, you can use the location block to modify a specific directory inside the website or app.
Remember to save the changes and restart Nginx by running the control beneath in your last:
sudo service nginx reload
Sometimes, providers restrict access the Nginx configuration file. Then, yous'll have to contact the support team so that they can adjust the settings for you.
9. Use the WordPress 'upload_size_limit' Filter
WordPress includes the upload_size_limit filter that regulates the maximum upload size for the php.ini file. If you lot want to edit this filter, you need to discover your theme's functions.php file.
After you lot log in to your WordPress website, open the Theme Editor in Appearance on the left side of the dashboard. You'll open up the functions.php file where you need to add the following lawmaking:
function filter_site_upload_size_limit( $size ) { return 1024 * 1024 * 64; } add_filter( 'upload_size_limit', 'filter_site_upload_size_limit', 128 ); As you tin see, the last line of this code sets the maximum upload file size of 128MB. You may choose another value and change the code if necessary. Afterward, remember to press the "Update File" push button to relieve the changes.
10. Use a WordPress Plugin
If you don't want to bargain with coding and changing root files manually, you can install a WordPress plugin developed for these purposes. Let'southward consider several plugins that will assist you in modifying upload limits hassle-free.
1) WP Increase Upload Filesize by CodePopular is uniform with WordPress four.0 and newer versions. After installing and activating the plugin, yous can find it on the main dashboard of your WordPress website. When you click on the settings, you'll see the upload limit ready by your hosting provider. If this limit is bigger than your WordPress maximum upload size, you lot can increment the latter. Employ the dropdown card to utilize the necessary settings.

ii) Increase Maximum Upload File Size by Imagify is another plugin suitable for irresolute the upload file size. It works with WordPress 3.0 and newer.
When y'all have installed and activated this plugin, you should become to Settings on your dashboard and click on the 'Increase Maximum Upload File Size'. The plugin automatically identifies the limits set by your hosting provider and WordPress. Thus, you tin increase the WordPress limit so that it doesn't exceed the server limit.

3) WP Upload Size past Husain Ahmed tin can likewise exist used to alter the limit for uploading files. It'due south compatible with WordPress iii.7 or newer.
After the plugin'due south installation and activation, y'all'll find it in the Tools department of your dashboard. To increase the limit for WordPress files, you take to enter a numeric value in bytes. Remember to save the changes.

Different the plugins described previously, the WP Upload Size doesn't show yous the limit prepare by the hosting provider.
11. Upload Files via FTP/SFTP
Besides uploading files with WordPress Media Library, you tin can also upload them via FTP or SFTP. If the methods described above didn't work for you, uploading files with FTP/SFTP volition solve the problem of a limited file size.
FTP, or File Transfer Protocole, lets you add together files from your local estimator to your website's server. Follow these steps:
- Open your FTP client
- Detect the binder for uploads (unremarkably, it'southward wp-content/uploads/… and a twelvemonth/month)
- Open the folder on your PC with local files that you wish to upload
- Elevate and drop the files from the computer to the server.
It may happen that WordPress doesn't recognize the files that you added via FTP/SFTP. And then, you can take advantage of the costless Add from Server plugin. Information technology is suitable for WordPress 5.4 and newer. Later on installing and activating the plugin, you'll see the 'Add together from Server' section under the Media menu on your dashboard. You should choose the folder to which you have imported the files via the FTP client. Then, select the files and printing 'Import'. And so, y'all'll be able to encounter these files in your Media Library.
Verify Your WordPress Site's New Max Upload File Size
Any method y'all accept called to change the file upload limit, it's better to check that it has worked. The easiest way to ensure this is to go to the Media Library and check the maximum upload file size there.

In addition, yous can go to the Site Health Info page and check the data nether Media Handling and Server dropdowns.
To conclude, the multifariousness of methods to increment the WordPress upload limit is vast. If you are ok with coding, you can edit php.ini, .htaccess, and .user.ini files or change the limit with the WordPress filter. If you adopt to keep away from coding, install plugins and change the limit in several clicks. Even when these methods don't work, you tin always upload files directly to the server with an FTP client.
Earth-Class WordPress Development Services from PSD2HTML
Having trouble increasing the WordPress upload limit or performing another task to make your website fast and functional? Our WordPress developers will help. With 16+ years of manufacture experience and thousands of successfully completed WP projects, we know everything nigh the world's most popular CMS.
Contact us with whatever WordPress-related task, from developing custom themes to improving your website's Core Web Vitals scores. Helping your business succeed is our top priority!
Source: https://www.psd2html.com/blog/easy-ways-to-change-wordpress-upload-limit.html
0 Response to "Wordpress How to Change Max Upload Size"
Post a Comment